15: Sensori OverLord

terminal 0

unfinished

L'Kt<@>

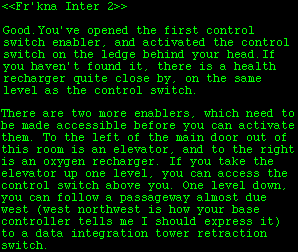
This was done to guarantee that the ship would not be of use to any attackers who managed to gain control. What was not planned for was a reactor breach. Damage to the primary navigation decks was severe, and the controlling computer is totally inactive. I have no way to contact Ygn'oml in that section of the ship. If the sensors here were online, I could reverse the active signal and use it as a contact method. I do not even have the ability to contact Ygn'oml in this section of the ship. I am only able to communicate with you through the aid of your base controller, and if that signal is disrupted before your work is done here, you will be on your own.

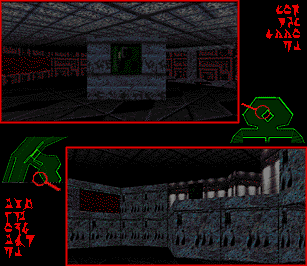
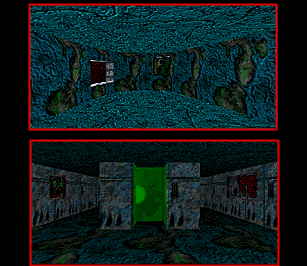
My recommendation is that your first priority should be to get the main lift running. This will give you access to the only unprotected control switch enabler. Your second priority should be to find the main life support center. This area contains a health recharger, which I've configured to operate with your suit, an oxygen recharger, which will be necessary because this level has been evacuated to minimize combustion risk (Ygn'oml are able to survive for very long periods of time without oxygen), and a pattern buffer, in which I can store your life readings in the event of physical damage. This is also the location of the main communications link switch, but that will remain inaccessible to you until you have activated all three sensor arrays.

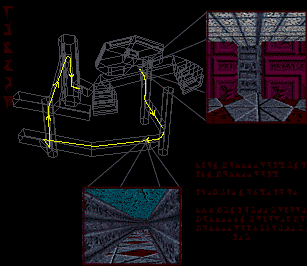
Once these two areas are secured, you should retract the data integration towers to allow access to all control switch enablers. After you have activated all three enablers, you will have access to the three control switches. Flipping these will give you access to the main link switch. Your base controller tells me that your suit has the ability to automap. You should use this function often in this area.

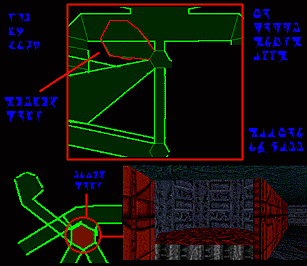
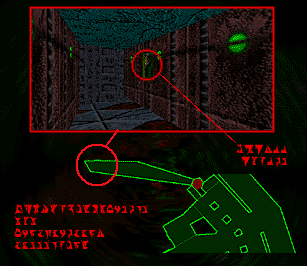
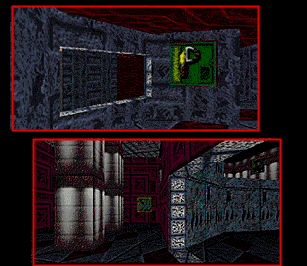
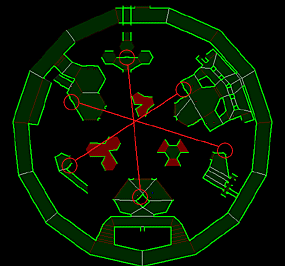
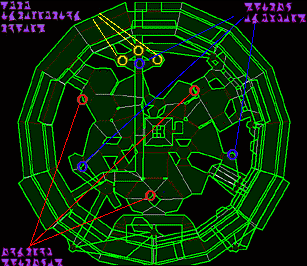
This is your current location. It is possible, but not simple, to return here once you leave. This is the main central lift. In order to get there, drop into the drop tube behind you, leave it almost immediately going due south, and take the due west passageway out of the next drop tube.

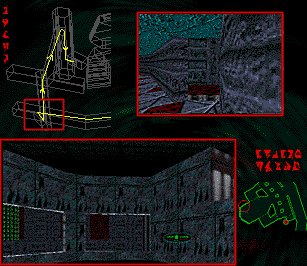
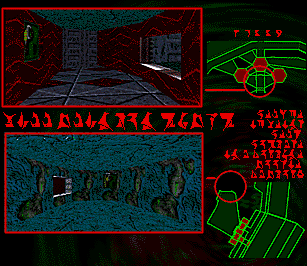
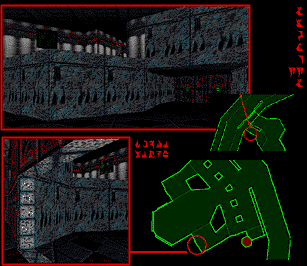
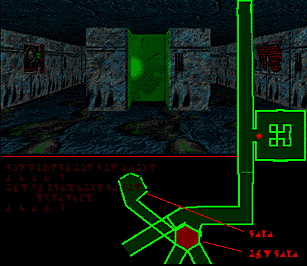
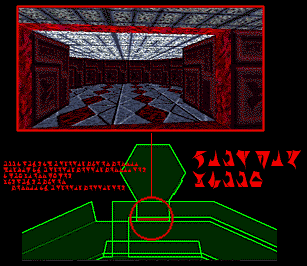
These instructions will lead you to this elevator. From here, you can go northeast to the main central lift, and a 150° turn will drop you into the lift activation room. At the top of the lift is the first control switch enabler. If you miss any of the exit passageways, you will end up on the bottom level of this facility, and will need to work your way back up. Hopefully, by the time you reach this communication console, I will be better able to show you the rest of the switch locations. Head here after recharging your suit's oxygen supply at the main life support center.

L'Kt<@>

terminal 1

unfinished

L'Kt<^*^>

(The other one is in the passageway leading north from the main life support center.) You can then come back to this same elevator and ride it to the top level. Follow that passageway to the outermost ring, and you will be able to reach the second control switch enabler. The third control switch enabler is in the southeast quadrant of this facility. Access is via an elevator on the southernmost part of the outer ring. You will find a room there with a panel switch. Flipping this switch will open the panels, and allow entrance to the enabler room (which is one level below the switch).

Once these two enablers are activated, you will be able to operate their corresponding control switches. There are communication terminals near each control switch, so I may be able to provide you with more information along the way. Remember, use your map often. This is the second data integration tower retraction switch.

The second control switch enabler can be found here. The third control switch enabler can be found here. The elevator providing access is directly south. (These enablers do not need to be activated in any particular order.)

Here is the control switch that corresponds to the second enabler. The control switch that corresponds to the third enabler is at this location. Remember, I will be able to give you more information at these locations. <<Fr'kna close>>

L'Kt<^*^>

terminal 2

unfinished

L'Kt<##>

The reactor core is dangerously close to destruction, but the Ygn'oml seem unaware of it. They have sealed off the hull breaches, but most have left the navigation deck, and so cannot respond to the automatic alarm systems. The intruders there do not seem able to interpret our controls. You will need to finish your task here as quickly as possible, so that I can send you to the navigation deck.

If you haven't already found it, the enabler for this control switch is located here. There is an oxygen panel here.

There is another oxygen panel at this location. There is a health recharger here.

You can always return here for recovery. <<Fr'kna close>>

L'Kt<##>

terminal 3

unfinished

L'Kt<~!~>

<<Fr'kna Inter 4>> In the arbitrary numbering scheme I have chosen, this room contains the third control switch. You must release a sensor's interlock before that sensor's control can be linked into the main comm grid. Be sure, then, that you've found and activated the first and second control switches. You must hurry. Time is running out in the fight to save this ship.

This is the enabler that releases the control switch in this room. Once you have activated all three control switches, return to the main life support center on the bottom level. The main comm link switch will have been made accessible, and you will be able to reactivate my sensor system by integrating all functional sensors. If you are successful, the transport facility will also become operational.

This is the transport facility. It is on the same ring as the control rooms. The doors will function only when I've been able to remove the security locks, after the comm link grid is working again. You will need to get here to be transported to the navigation deck. <<Fr'kna close>>

L'Kt<~!~>

terminal 4

unfinished

Transporter <Af8440.2>

<<Fr'kna Rm'ha 32>> You have been successful in reintegrating the sensor arrays for this section. I was incorrect, however, when I told you that I would be able to reverse the sensor signal in order to contact the Ygn'oml on the navigation deck. It is possible that there are simply no Ygn'oml left alive there, but I have been unsuccessful at determining the actual status of that area. I must send you there anyway. If the ship's reactor goes, everyone on this ship, and everyone on the planetoid below, will die. I will have more information for you when you arrive there. Be sure to replenish your oxygen supply before leaving this area. Prepare to transport. ***#################*** ***TRANSPORT ENABLED***

Transporter <Af8440.2>

terminal 5

unfinished

L'Kt<^*^>

<<Fr'kna Inter 2>> Since you haven't activated the first control switch enabler, the control switch above your head is inoperable. To get back to the enabler from here, you'll need to enter a chute that faces south, and is in the southernmost ring on this level. Follow the path delineated on the map, and you should be able to reach the enabler. Return here when you've done this.

L'Kt<^*^>

terminal 6

unfinished

SECRET TERM

Not too shabby... none of the beta testers found this! (At least, not without a map editor.. .you didn't use a map editor, did you?) DID YOU? Congratulations, and you're about 75% through this scenario... hope you're enjoying yourself! Okay, if you forgot to collect the ammo behind you, hit ESCAPE and do so now... otherwise, hit your action key and continue with the level. Cheers, CAE 15 Nov 96

BYE

<teleport to polygon 228>