3: More tricks

terminal 0

terminal 1

terminal 2

terminal 3

terminal 4

terminal 5

unfinished

Sorry about the sudden teleport. "Done, eh?" and "More tricks" (where you just arrived) were originally built as a single level. However, when I finally got around to writing all the terminals for it, I ran into a Marathon limit that I haven't seen mentioned anywhere: 32K of terminal data per level. Since I had close to twice that amount, the only solution was to split the level, and this was the only point at which I could split it that didn't involve major rearrangement of the level's flow. Now, back to our regularly scheduled programming...

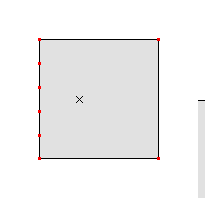
THE PEDESTAL PROBLEM If you've ever tried to build a switch, terminal, or recharger that's on a low side (one that you can see over) rather than inset into a solid wall, you may have encountered problems getting them to work. Missed Island has a lot of switches like this, and it about drove me crazy trying to figure out why some worked, and some didn't. I call this the Pedestal Problem (catchy, isn't it). You just walked past a simple demo of this problem. There are two switches, both controlling the same light. All settings for the two switches are identical. Yet only the left switch works properly: the right one only toggles if punched (or hit with an appropriate weapon). The only difference between the two switches is the ceiling height...

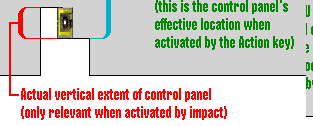
Here's how I believe things actually work: Only in the case of toggling a switch via a weapon or punch is its vertical location actually relevant. For anything controlled by the Action key (switch, terminal, recharger, or door), what matters is the polygon immediately in front of the item. The active area seems to be about 0.5 WU above or below the center of that polygon's height (although I haven't tried to measure it exactly). So, a control panel on a pedestal will only work in areas with a ceiling height not much over 1 WU. In a taller room, the active area of the control panel will actually be up in mid-air over the pedestal!

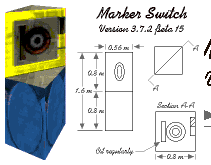
On Missed Island, the marker switches which respond to the Action key are precisely the ones in areas with a "sky" (ceiling) height of about 1 WU above the ground. Where the sky is higher (due to proximity to a tall building), the switches have to be punched to activate them. The most annoying instances of the problem are the clock setting switches, and they are also the most impossible instances to fix. The sky there is 4 WU above the ground: if that was reduced by more than 0.5 WU, the top of the clock tower would be clipped when viewed from some locations. That would still leave the active area of the switches about 1.5 WU up in the air. Perhaps in the next version I'll supply you with a 3X recharger (not on a pedestal, of course) and a missile launcher so you can blast yourself up to the proper height.

As far as I know, there's nothing that can be done about this problem other than redesigning the level to have lower ceilings, or using control panels set into walls rather than on pedestals. On Missed Island I couldn't avoid having switches on pedestals, so all I could do about the problem was to write it into the storyline as "sticky switches". Hopefully this discussion will help some of you to avoid the frustration I went through upon encountering the Pedestal Problem.

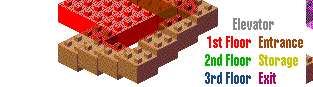
Now it's time for some tricks that weren't used in the Missed Island level, either because they didn't fit the storyline, or because the #$*&%@ clock tower used up all the platforms... The first two are elevator variations, based on the same fundamental technique as the combination lock: the ability to make platforms stop at arbitrary heights, via the use of a hidden control platform. Proceed onward, and do what comes naturally when you encounter circuitry panels or switches...

terminal 6

unfinished

ZIG-ZAG STAIRS Did you notice that the platforms (other than the ones at each end) moved by two different amounts, depending on which end of the stairs was being raised? That effect required two separate control platforms for each of those platforms, with different active times. Here's a diagram of how the stairs were built. Arrows indicate control of one platform by another platform or by a switch: numbers indicate the amount of vertical motion of the control platforms (and therefore also the visible platforms adjacent to them).

Here are some general guidelines for building puzzles of this sort: • The control platforms should have the following flags set: Deactivates At Each Level, Can't Deactivate Externally, Activates Adjacent On Activating, Deactivates Adjacent On Deactivating. • The controlled platforms should have Deactivates Never set. You might think that this is irrelevant, since deactivation is actually controlled by another platform, but it does make a slight difference in the distance the platform moves. I can't explain this, but I will point out that I couldn't get any of the puzzles based on platform control to work just right without the Deactivates Never flag. • Both control and controlled platforms should move at the same speed. This makes setting the control platform's min/max heights very easy: just make their difference equal to the distance you want the controlled platform to move. • To hide the control platforms on the automap, double-click on the lines separating them from visible areas. Check 'Solid' and uncheck 'Transparent'. It also helps to locate them entirely above or below the altitude of the visible areas.

Next is a more ordinary elevator, with stops at 4 distinct levels. You can go down one level for free, but the next two require more effort (hitting a switch and retrieving a chip, respectively). This concept could form the central core of a solo/coop level: obviously you'd want to have more challenging tasks to perform on each level before allowing access to the next. The elevator is implemented with two platforms, as described on the previous screen. The control platform is hidden behind one of the corners of the controlled elevator platform. The control platform moves through 1 WU vertically, and thereby sets the spacing of the elevator floors. The only limit to number of floors is the -9/9 WU altitude limit imposed by Forge. If you have more than 7 floors, you'll have to split the elevator into multiple platforms so that there is at least one more side to the elevator shaft than there are exits (one side has to connect to the control platform rather than to an exit).

terminal 7

unfinished

When designing a puzzle like the elevator you just saw, an important consideration is that all of the floor switches do the same thing: they activate the control platform. Therefore, any one switch would be sufficient to take the elevator all the way to the bottom floor, if the player could use it repeatedly: to prevent this you must somehow arrange for each switch to be usable only once. Destroyable circuitry and chip-insertion switches are obvious solutions. It might be possible to design the elevator so that the player can't possibly activate it without being carried down a floor, and can't get a line of fire to a switch on a previous floor (but beware of players missile-hopping up to a higher floor). Otherwise, any ordinary switches used to control the elevator must be light activated, and be assigned a light that is turned off by the elevator's motion. It's easy to have up to four such lights: just turn on Deactivates Polygon Lights for both the control and elevator platforms, and use their floor and ceiling lights. Additional lights would require additional platforms adjacent to the control platform.

LIGHT-ACTIVATED CONTROL PANELS While we're on this subject, here's an important detail that isn't mentioned in the documentation: light-activated switches, terminals, etc. do NOT care whether their associated light is actually active! All that matters is the intensity of that light. If it's currently more than about 75% (I'm not sure what the exact number is), then the control panel is enabled. This means that if you define a light to be dark when active and bright when inactive, a control panel using that light would be active only when the light is inactive, and vice versa.

TELEPORTER DESTINATIONS Another bit of Marathon trivia for you: You're probably aware that when players teleport within a level, they appear in the center of the destination polygon. What you're probably not aware of is what Marathon considers to be the center. The game apparently just averages the coordinates of all the polygon's vertices. This is a very simple calculation, but it's not necessarily the center of the polygon in any geometrical sense. For example, teleporting into the square shown here, which has extra vertices along one side, would place you at the "X" (one third of the way from the edge). ------------------ Next is a purely visual effect. Proceed to the next terminal, paying close attention to the room that you'll pass through twice.

terminal 8

unfinished

I'll bet you've never seen a bridge in Marathon that looked quite that realistic. This is your last chance to come up with a guess as to how it was done...

Actually, it was a total fake. You went through two separate rooms, one with the passage under the bridge and one with the walkway on top, that are precisely overlapped in 5D space. In the first room you went through, the apparent open space above the passageway is actually a solid column, with the landscape texture applied to all sides so that you couldn't distinguish it from the room's ceiling. Shown here are screen shots taken from normally inaccessible positions within each room, with the central column in the first room retextured so that you can see it. The lava texture is used for all surfaces you can't see in normal passage through the rooms.

This trick is quite effective visually, but does have some severe limitations on its use: • The room's top must be open to the sky. Otherwise, there would be no way to conceal the central pillar in the 'under' version of the room. • It's usable in solo levels only. If there were two players, one in each version of the room, they'd wonder why they couldn't see each other. • It should only be used at a point in a scenario where the player can't possibly have an assault rifle or missile launcher, since trying to grenade-hop up or down a level would completely spoil the illusion. • If there's any combat in the rooms, it must be with creatures (such as Compilers) that leave no corpse. Otherwise, there would be a noticeable inconsistency between the two versions of the room due to different placement of corpses. If you'd like to examine the rooms more closely, open the map in Forge where you have a Jump key. You'll need to set a starting point closer to the rooms (by command-clicking in a polygon), since you can't reach them from the start of the level (due to a chip insertion switch that can't be activated in Forge).

Coming up next is another trick for doing elevators that stop at more than two floors. See the diagram (made with the help of a demo version of Gryphon Bricks™) for details: Red - first floor. Green - second floor. Blue - third floor. Gray - elevator shaft. Brown - entrance, to the right of this terminal. It goes past the 2nd floor, then stairs lead down to the 1st floor. Yellow - storage area, on second floor. Purple - exit, on third floor. And yes, all three floors connect to the same side of the elevator... Your goal is to reach the exit on the 3rd floor, but you will need to pick up an item on the way.

terminal 9

unfinished

Did you figure out what the trick was that allowed multiple elevator exits through the same door? Hint: the diagram of the area that I showed you has almost NO connection to the actual layout of the floors.

Again, this effect is a total fake. The "elevator" doesn't actually move at all: it IS a platform, but only so that it appears as red on your automap. The area just outside the elevator door consists largely of platforms that do move, reconfiguring the area into the appearance of three separate floors. These platforms are flagged as Secret so that they don't appear as platforms on your map, except for the thick line around them (there will be more details on working around that problem later). The version of the 2nd floor that you can see from the entry corridor is a fake duplicate. Likewise, the version of the corridor that you can see from the "real" 2nd floor is also a fake. The entry corridor loops over the 1st floor purely for the sake of misdirection: it obscures some of the boundaries between platforms, that would otherwise result in thick lines appearing on the map for no obvious reason (usually a dead giveaway of a secret platform).

Some other platform edges were obscured with the following trick: if any of the textures on a line (high or low, on either side) are landscapes, then the line will appear thin on the automap regardless of any other considerations. There are three instances in this demo where a far side of a platform is given the landscape texture. You can never actually see these sides, since you can't get to that side of the platform unless it is lowered (if you can even get there at all), but they still affect how the line appears on the map. The results aren't perfect: ideally there would be no line at all in these instances, rather than a thin line. But at least they avoid an unexplained thick line, which any experienced Marathon player would recognize as a sign of a secret platform. (The same trick was used on Missed Island to conceal the fact that the big sunken ship and large upright gear are actually composed of platforms which can move. In these cases, the ceiling height was made different over each platform, and the resulting high walls were landscape textured.)

The control mechanism for the elevator is fairly complicated, since the set of platforms which have to be raised or lowered depends not only on the floor you're moving to, but also the floor you're currently on. A modification of the Enforcer/Tick shooting gallery idea is used, as shown in the diagram here. One Enforcer is enabled, based on the current floor, and one Tick is enabled, based on the floor button which has been pressed. Each of the nine possible lines of fire strikes a switch. For the six possible transitions between different floors, the switch is a tag switch which activates the appropriate platforms. For the three possibilities of pressing the switch for the current floor, the lines of fire all hit the center switch, which is simply a platform switch that reopens the elevator door. All of the switches are light-activated, and one of the first effects of activating any of the switches is to darken that light. This prevents multiple switch activations per use of the elevator, which would leave the puzzle in an unpredictable state. The same light also controls a liquid level, which floods the Ticks with lava in order to kill them (they immediately reappear, due to the monster parameter settings). This is necessary to get the Enforcers to accept the next Tick revealed as their new target: otherwise, they would remain locked onto the original Tick even though they no longer had a line of sight to it. (My wife keeps threatening to report me to the Society for the Prevention of Cruelty to Ticks. Do you think she might have a point?) If you'd like to see this control room in operation, there is a way to access it. Return to the elevator, and punch out the three light fixtures along the back wall. You'll then be able to walk through this wall, into a teleporter that will take you to the control room. (The control room has a teleporter that will return you to the elevator.) It would be a good idea to save the game first, since it's possible to screw up the elevator mechanism by killing the Enforcers, or hitting the control switches yourself in an inappropriate order. As with the demo AND gate you saw earlier, there will be some texture smearing in the control room where liquid levels are being used in unsupported ways. This wouldn't be a problem in an actual level using this technique, since the player would never be allowed into the control room.

As with the bridge trick, this elevator design is only suitable for use on a solo level. It would NOT be a pleasant experience to be a player out on one of the floors, at the time that another player activates the elevator... Also, combat with corpse-leaving creatures must not be allowed, at least not in the shared areas of the floors, to avoid having the corpses inexplicably visible in the same place on other floors. Other combats can take place in areas reachable from only one of the floors: for example, there could have been a guardian of some sort in the 2nd floor storage area where you found the uplink chip. Just make sure that any such creatures are blocked from the shared areas via a Monster Impassible polygon.

FAKE ELEVATOR - SUMMARY The resources used by this 3-level elevator are: • About 39 platforms (ouch!) • 12 lights • 6 tags • 4 liquids • 3 Enforcers + 3 Ticks • 6 sound objects Note: the complexity of the control mechanism grows rapidly with the number of floors. A 4-level version might barely be possible, but any more floors would require a simpler control mechanism design. One possibility would be to have buttons to move up one floor, down one floor, and open the door, rather than having buttons for direct access to each floor. This would require 2N-2 different floor transitions to be implemented instead of N^2-N.

IDEAS FOR FURTHER DEVELOPMENT • Much better use of lighting could be made to give each floor a distinct appearance. Currently, only one light varies between floors (the darkened frame of the window on the 2nd floor). • The illusion of vertical movement could be strengthened by having the lowest floor partially flooded. This would require a light that is activated only when on that floor, that controls a liquid applied throughout the floors. I would have done this for the demo, except for the fact that I was long since committed to the lava texture set before the idea occurred to me... • The previous idea could be extended by having the lowest floor completely underwater, with the next floor up being partially flooded. Implementing a liquid with three distinct heights is left as an exercise for the reader. Hint: I'm pretty sure that this is possible, using a light with extremely long transitions. However, the liquid height would slowly drift from at least one of the levels, so some compelling reason (such as an oxygen recharger on another floor) must be provided for the player to periodically use the elevator, so that the liquid level gets reset.

terminal 10

unfinished

What work would be complete without the author's signature? I didn't invent the idea of writing with lit textures, but I believe I can claim to be the person who got the most carried away with it... Unlike most of the tricks I've shown, this one requires NO platforms (hurrah!). It does require a fair number of lights, up to 16 for a four-line message (the longest that will work with this technique). There is no additional cost, other than the additional polygons required, for the number of characters in each line of the message. The basic idea is that there are a fixed number of patterns that any segment of the display can follow. For example, a given segment might be lit for the 1st, 3rd, and 4th lines of the message, and dark for the 2nd line. For a 4-line message, there are 16 possible patterns (2 raised to the 4th power). Lights need to be assigned and set to blink in each of these patterns. Note that one pattern is always on, and one is always off: these can use the standard lights #0 and #20. Marathon's lights can create any of the 16 patterns, using the Phase, Primary Active, and Secondary Active parameters. The more complex patterns that longer messages would need could only be done with the use of stateless lights, as mentioned on page 40 of the Infinity manual. It's a shame that this feature never was implemented... All that remains is to determine which pattern applies to each segment of the display, and assign the appropriate light to it. This is a very tedious process, but it is fun to watch the letters slowly emerge from chaos as more and more of the segments are correctly lit. If you want to display a message using this technique, keep in mind that the 12-segment display units shown here don't work very well for some letters of the alphabet (K, Q, V, X, Z), and are really lousy at punctuation marks. Real alphanumeric displays generally take one of two forms: 1. A grid of at least 5x5 dots or squares, 5x7 for mixed upper and lower case. There's no reason this couldn't be duplicated in Marathon, but it would take a LOT of polygons. 2. A 16-segment display, consisting of 12 segments as you see here plus 4 diagonal segments (lighting the diagonals alone would produce the letter "X"). This can produce all uppercase letters reasonably well, and many punctuation marks. However, duplicating it in Marathon would require a custom texture (at least for the diagonal segments), similar to the texture I used for the Missed Island clock tower digits.

Well, that's all for now. I hope you've found these tricks to be interesting, educational, and inspirational for your own map making efforts. If you use any of these tricks in a map, please write me a note: credit in a terminal or README file would also be appreciated. Jason Harper CompuServe: 76703,4222 Internet: 76703.4222@compuserve.com Did you find the secret terminal? It's in plain sight: if you didn't find it, you were just approaching it from the wrong direction. You will now be taken back to the first half of the tutorial section of this scenario, in case you want to revisit any of the terminals or demos there. Otherwise, it's time to quit. < PREPARE TO TELEPORT - ESC TO ABORT >

terminal 11

terminal 12

unfinished

Did you notice anything unusual about this room? Hint: there are NO custom textures involved. Everything you see is an ordinary Marathon texture.

Stretching or squeezing the textures is accomplished by lying to Marathon about what the actual lengths of the textured walls are. Wall lengths are calculated once only, so that the game doesn't have to recalculate this value each time a wall is displayed. In fact, one of the optimizations performed by the map merging process is to precalculate the lengths of all walls, so that the game doesn't have to do this work when loading a level. However, if one of these precalculated wall lengths is changed before playing the merged map, the game will happily use the new length. For instance, a wall changed to specify a length of 1 WU will display one complete repeat of its texture, regardless of the wall's actual length. Negative lengths cause the texture to be mirror-imaged (notice the pattern buffer). Using this technique is currently a rather tedious process involving a low-level file editor and a calculator that can work with hexadecimal numbers. However, there's no inherent reason why tools couldn't be developed to automate the process. I'm NOT suggesting that people should go and stretch every single texture on their levels, but I do believe that appropriate use of this technique could add visual appeal to a level. In effect, it gives you more texture variations to work with.

There are a few inherent limitations on texture stretching/squeezing: • It only works with walls, not floors or ceilings. • It only affects the width of textures, not their height. • There is undoubtedly some limit to how long you can set a wall's effective length to without messing up the display. I haven't done any experiments yet to determine this limit, but I'd guess that it's just under 32 WU. Of course, if you wanted a wall with an effective length greater than the limit, you could split the wall into multiple sections, all in a straight line. • I suspect that this technique will only work reliably on solid walls. If you tried to use it on walls that can be walked over or under (such as a panel over a door, or the risers on a staircase), Marathon may not be able to accurately determine if the opening is wide enough to allow you or other creatures to pass.

The technique has some additional limitations due to the fact that it isn't integrated into the level design process. These would go away if Bungie were to implement it as a new feature in Forge... • The wall length changes have to be applied to the merged map file: editing the individual map levels accomplishes nothing. • The changes have to be reapplied every time the map is merged. Obviously this is something that you'd want to put off until the map was otherwise finished. • It's hard to align stretched textures properly since you can't preview them in Forge. Basically, what you have to do is position the left edge of each texture as desired. Changing the wall's effective length will reposition only the right edge of the texture.

If anybody wants to try this for themselves, here are the gory details: 1. In Forge, write down the line #, actual length, and desired length of each wall that you want to stretch or squeeze. The first two items can be determined by clicking on the wall. 2. Open the merged map file in a file editor. I use a freeware utility called HexEdit (not to be confused with Hex!, the terminal editor). 3. Search for the text "LINS", which marks the start of the line-related map data. This will find the data for level 1: if you wish to edit walls on a higher level, you will need to do a Find Next, (level - 1) times. Make a note of the file position at which this text is found. 4. For each wall to be edited, calculate a file position as follows: [position of "LINS" (hex)] + [line # (decimal) X 20 (hex)] + 16 (hex) 5. As a safety check, make sure that the two-byte value starting at the computed position matches the wall's actual length (multiply the length in WU by 400 (hex) to convert). 6. Change these two bytes to the desired value: again, multiply by 400 (hex) to convert from WUs. Make sure you overwrite the bytes: if you insert them instead, you will destroy the map file (of course, this is the merged version, so you can simply merge again to regenerate it).