2: Done, eh-

terminal 0

unfinished

Welcome to The Making of Missed. This level contains explanations and working demos of the techniques used in Missed Island's unique puzzles. There are some additional tricks shown here based on the same basic ideas, and a collection of unusual ways of placing terminals and pattern buffers. These ideas are presented in the hopes that they will be an inspiration to other map makers. I make no claim that this level is at all fun to play. If you aren't a Marathon map maker, you might as well quit now: there's nothing here for you.

THE INTRO (LEVEL 1) Yes, that was actually a Marathon level... The unusual behavior of the intro level is due to a custom physics model: all of the player's movement parameters are set to zero, so there's no way to miss the "movie" (except by viewing the automap, which I didn't see any way to disable). Even the player's fists are disabled, to keep them from being raised in front of the movie: this was done by redefining fists to be a weapon requiring ammunition (which you don't have any of). All of the action is controlled by a series of platforms, most with rather long delays, some of which control lights. The letters spelling "MISSED" are actually various ammo clips, with their graphics replaced, that teleport in at the start of the level. They fade due to a light that is deactivated a few seconds later, and disappear completely because they're on a platform that is lowered shortly after that. The scrolling text is done with a couple of replaced textures, on a series of slowly rising platforms. The book (terminal) at the end is on the side of a platform that lowers after a very long delay. The pulsating glow around the book is a scenery item on a platform that raises in front of the book at the proper moment.

The rather small appearance of the movie was an unfortunate necessity. The action has to take place far enough away from the player for items with 0% lighting to be completely invisible. If you were any closer, the operation of some of the machinery would be visible (and ugly). I had hoped to compensate for this by adjusting the focal length (half camera separation) in Anvil, to effectively magnify the action to fill the screen. However, changing this parameter has no effect: apparently it is hard-coded into the game rather than being read from the physics model.

terminal 1

unfinished

COMBINATION LOCK (PART 1) The fundamental trick behind the combination lock is that it is possible to make a platform move in arbitrary increments (rather than going all the way to one of its limits), by controlling it with another platform that has the Deactivates At Each Level, Activate Adjacent On Activating, and Deactivate Adjacent On Deactivating flags set. Both platforms will move for exactly the same period of time, set by the control platform's speed and min/max height. If the time required for a complete cycle of the controlled platform's movement is an exact multiple of the control platform's time, it will reliably step through a set of evenly spaced positions (the number of positions being equal to the multiple of the control platform's time).

This effect is used to implement each digit of the combination lock. The controlled platform has one side textured with a pattern containing a vertical strip of digits (other symbols could be used, of course). This is visible through a window the size of a single digit, showing the current setting. The only constraint is that the strip of digits, and therefore the vertical range of the platform, be no higher than a texture (128 pixels, or 1 WU): if there was any more vertical motion, some digits would repeat themselves. I chose to use 8 digits (0 thru 7) for each position of the combination lock, since that divides evenly into 128. If I had used 0-9, each digit would have to be somewhat smaller (12 instead of 16 pixels high), and it might have been impossible to get the timing of the control platform exactly right (since none of the relevant parameters are exactly divisible by 10).

The next room contains a working model of a 1-digit combination lock. From left to right, you'll see: 1. A platform switch, which activates: 2. The control platform, which moves through a fairly small range (about 1/8 WU). It is not visible in the actual combination lock on Missed Island. It must have the Can't Deactivate Externally flag set, so that it can't be stopped in mid-digit. It controls: 3. The indicator platform, which has the texture with the strip of digits. The gap in the red column represents the window through which you see the current digit. This platform moves through 7/8 WU (if it moved a full WU it would repeat a digit). It, in turn, controls: 4. The target platform. This has exactly 8 times the vertical range of the indicator platform (7 WU), but is also exactly 8 times as fast. It therefore stays in perfect sync with the indicator, and is basically an 8X magnified version of it. The purpose of the target platform, and of the switch that's in mid-air in front of it, will be explained later. Please play around with the model so that you can see how it works. There is an observation deck at the south end of the room, which may help you to see "the big picture". It is accessible by teleporters in the corners, and has a duplicate of the platform switch (1).

terminal 2

unfinished

COMBINATION LOCK (PART 2) If you've managed to follow the description so far, you can see how a combination lock with any number of digits can be built. The next step is to somehow determine when these digits are set to the proper value, so that some action can be triggered (unlocking a safe, perhaps). Unfortunately, Marathon offers no direct way of detecting when a platform is in a certain position. Time for another trick... try not to laugh too hard when you see how I solved this problem.

My solution is to have one creature firing at another, one of which is on a platform. (This is the purpose for the target platform mentioned earlier: the indicator platform itself doesn't move far enough for this to work.) A switch is positioned such that it will be struck by the creature's fire only when the platform is in a specific position. I have arbitrarily chosen the Enforcer Minor as the firing creature (since their normal weapon is capable of triggering switches), and the Tick Kamikaze as its target (since they don't seem otherwise very useful for anything). However, some physics model tweaking is necessary to make this technique work reliably, and could just as easily be applied to any two creatures that aren't otherwise needed on the level.

Here are the necessary physics and monster parameter settings: The Tick is made completely immobile (movement speed 0, can't float or fly) so that it doesn't wander off. It is set to have no dying or dead shape, to avoid cluttering up the level with corpses (an alternative would be to have the shot being fired do 0 damage). In Forge, Ticks are set to have an infinite number available, with 100% appearance. The min count is set equal to the initial number of Ticks present. In short, Ticks are turned into immortal, immobile lumps. The Enforcer is set to fire individual shots instead of bursts, with 0 error (otherwise, the switch would occasionally be hit even if the indicator was off by one). The firing rate, and the movement speed of the shot itself, are increased in order to minimize the response time. The player is removed from the Enforcer's list of enemies, so that their actions can be observed without drawing fire. The Minor/Major flags are cleared for both types of Enforcers, so that neither gets transformed into the other based on the difficulty level. Both creatures have the Can't Skip flag set, so there's no chance of any of them being omitted on easier levels.

To summarize how all this fits together: For each of the three digits of the combination lock on Missed Island, there is a corresponding "shooting gallery" consisting of a target platform, Tick, Enforcer, and a switch (what the switch triggers will be discussed later). The vertical positions of the three switches are adjusted to set the lock's combination. The shooting galleries are located far to the north of the player-accessible portions of the map, so that they can't be noticed either by sound or via motion detector.

The indicator platforms are extremely long: one end of each is visible in the cabin where the combination lock is located, and the other end reaches through 5D space to touch the target platform in the associated shooting gallery. The control platforms are adjacent to the indicator platforms, immediately behind the visible part of the lock (but of course they could be located anywhere along the length of the indicator platforms).

One gotcha that came up during the development of this technique is the need to somehow activate the Enforcers so that they start firing at the Ticks. Marathon normally does not activate monsters that are nowhere near the player, since their actions would take up CPU time that would be better spent on something the player could actually see. However, this behavior can be overridden with the use of Visible Trigger and related polygon types: all that is needed is a contiguous series of non-Zone Border polygons leading from the trigger polygon to the monster's location. In the case of the combination lock, a Visible Trigger is located just inside the cabin, where you can't avoid stepping on it before setting any of the digits. The trigger message propagates through the indicator polygons into each of the shooting galleries. The fact that you can't see into the indicator polygons is irrelevant: only the connectivity between polygons counts. There is a Zone Border polygon in the doorway of the cabin, to keep the trigger message from uselessly propagating all over the island. Another gotcha: the raised area containing the Enforcer must have at least three polygons. A creature with less potential mobility than that seems to be incapable of attacking normally.

To see an Enforcer/Tick shooting gallery in operation, just take a few more steps down the corridor you're in. This will teleport in a pair of creatures to the demo room you just left. You can go back and play with the demo some more, this time with it fully functional. When the proper digit is selected (2), the Enforcer's shots will hit the switch. For the purposes of the demo, the switch simply toggles the lights in the room. The Enforcer does not consider you to be an enemy, so it will not intentionally shoot at you unless you bother it.

terminal 3

unfinished

COMBINATION LOCK (PART 3) & AND GATES The last two terminals have described how a multi-digit combination lock can be built, and how to detect when each individual digit is set properly. All that remains is to somehow detect when ALL digits are set properly, and trigger some action based on this (such as opening a safe). In terms of digital logic, this function is called an "AND gate": to implement the 3-digit lock on Missed Island, a 3-input AND gate is needed.

As you will recall from the previous terminal, the result of each individual digit being correctly set is the triggering of a switch. Here's one idea for opening a safe based on all three digits being correctly set: have three doors on the safe, each controlled by one of the digit-triggered switches, such that all three have to be opened to access the contents of the safe. There are a few problems with this approach: 1. The safe's contents would be at least 4 polygons away from the outside of the safe: Marathon doesn't check that far away from the polygon containing the player for items to be picked up (this problem wouldn't affect a walk-in safe, however). 2. A safe designed like this would be fairly easy to solve by brute force. Just try all of the digits until you see the frontmost safe door open; then try the other two digits until the second door opens; and finally try the remaining digit until the inner door opens. For three digits with eight possibilities each, at most 48 combinations need to be tried (instead of the 512 total combinations of the lock). This would only work well if the safe was not visible from the lock, so that many long trips back and forth would be needed. 3. Keep in mind that the individual digit switches are hit repeatedly for as long as the digit setting is correct. If these directly controlled the doors to the safe, they would be in nearly constant motion when the safe is "open". This wouldn't make the safe unusable, but it's definitely not the desired behavior. Each door could be made to open only once (by using a destroyable switch, or a once-only platform), but that would make the lock ridiculously easy to pick: just cycle each digit through all of its possibilities, and the lock is guaranteed to be open by that time. In summary, this simple approach isn't really usable. It was described because it forms the basis of one of the more practical forms of AND gates, described next.

The multi-door AND gate becomes quite usable if placed inside an additional Enforcer/Tick shooting gallery: a switch is located so that it will be hit by the Enforcer's fire only if all the doors are simultaneously open. The doors are initially extended, and deactivate at their initial level. They must have the Can't Deactivate Externally flag set, so they can't remain in an open position if their controlling digit is changed to an incorrect setting. The delay or speed of each door should be slightly different: otherwise, a situation might arise where two doors are opening exactly out of sync with each other, never giving the Enforcer a clear line of fire.

COMBINATION LOCK - SUMMARY An N-digit combination lock requires: • 4N platforms (a different AND gate technique, to be discussed shortly, would allow 3N platforms + N lights + N liquids as an alternative). • N+1 Enforcers. • N+1 Ticks. • 1 texture with the strip of digits or other symbols (only a narrow strip is needed, the rest of the texture can be used elsewhere). • Whatever is triggered by the lock (1 platform, for a simple safe as seen on Missed Island). For reference, here are Marathon Infinity's limits on these resources: • 64 platforms • 64 lights • 16 liquids • 32 active creatures

IDEAS FOR FURTHER DEVELOPMENT • Have multiple combinations for a lock, each of which triggers a different action. This would require an additional switch located in each digit's shooting gallery, plus an additional AND gate for each additional combination. • Use letters instead of digits for the components of the lock: this would be more of a password-activated lock. You could use different lists of letters for each component (a single texture could have about 8 different strips of symbols). • Build a huge, non-linear scenario in which the central hub level is based on a multi-combination password lock as described in the two ideas above. Scattered throughout the scenario would be clues (of varying difficulty of either finding or solving the clue) to passwords which would open gateways to additional levels.

AND GATES, VERSION 2 The Missed Island level also needed an AND gate to implement the fountain puzzle, in which 8 switches have to be set to a certain state in order to raise the sunken ships. For a few reasons, the door-based AND gate described previously wasn't suitable: 1. The inputs are on/off switches, not continuously triggered switches as in the combination lock. 2. With eight doors between the Enforcer and its target, you might have to wait quite a while before they all happened to be open simultaneously. 3. Missed Island didn't have enough platforms left for me to be able to afford using eight of them on this puzzle.

Problem #1 could be solved by using pairs of platforms: one controlled directly by the switch, which in turn continuously activates the door in the AND gate (using the Activate Adjacent At Each Level flag). However, this doesn't help problem #2 any, and makes problem #3 even worse. Instead of platforms, the switches in this puzzle control lights, which in turn control liquid levels. Since the Enforcer's shots are not set to penetrate liquids (like SMG flechettes are), a raised liquid is just as effective as a raised platform for blocking the shots. The floor of the liquid-filled area is set very low (below the Enforcer's min ledge jump setting) to keep the Enforcer from simply walking over to the Tick, which would ruin the puzzle. Note that the situation pictured here is not one that the Marathon engine can display properly. A boundary between different liquid levels produces smearing: basically, liquids define a volume with a top but no sides. This isn't actually a problem in the game, since the player can never see into the AND gate mechanism. Just make sure that Enforcers have the Don't Complain About Ugly Texture Smearing flag† set. that was a joke, not a feature request

The fountain puzzle requires that 3 switches be "on" and the other 5 be "off" (puzzles in which you simply have to turn on all the switches are boring). There are a few ways in which an AND gate can require certain inputs to be on, and others to be off. The one I used was to paint the two types of switches differently: ALL of the switches must be active to solve the puzzle, but only 3 of them appear to be on when in the active state. The other 5 switches are active to start with, but only appear to be on if you mistakenly deactivate them. In retrospect, this wasn't the ideal solution, since it makes it rather difficult to change the solution of the puzzle. Two better ways to reverse the meaning of some of the switches: 1. Define the light that the switch controls in a backwards manner: 0% when active, 100% when inactive. 2. Define the liquid that the light controls in a backwards manner: low tide higher than the high tide. Yes, Marathon handles this situation just fine. Note that switches which should be in the active state to solve the puzzle (assuming the normal assignment of switch images to the active/inactive textures) MUST use one of the two techniques above, since the liquid level must be lowered to trigger the AND gate. A switch which should be in the inactive state must use neither of the two techniques, or both.

ON/OFF SWITCH PUZZLES - SUMMARY A puzzle of this sort, with N switches each having to be set to a certain state, requires the following resources: • N lights • N liquids • 1 Enforcer • 1 Tick • Whatever is triggered by the puzzle (in the case of the Missed Island fountain puzzle, this is 1 tag + 7 platforms + 1 light)

There is a demo AND gate right next to your current location. It has three inputs (controlled directly by switches), and uses the variable liquid level technique. Its output is simply a light that is activated when all three switches are on. Keep in mind that there WILL be some texture smearing, as described earlier.

terminal 4

unfinished

If you think about it, the Missed Island clock tower puzzle is just another version of the combination lock. This time, there are two "digits", each with 12 possible settings: one with hours from 1 to 12, the other with minutes from 00 to 55 in increments of 5. The clock tower in Myst is an analog clock, and in fact I could have done an analog version in a manner very similar to the existing combination lock puzzle. The hours indicator would be textured with a strip of 12 clock faces, with the hour hand in different positions. The minutes indicator would be a transparent strip of minute hands in different positions, overlaying the hours indicator. The only problem is the 128 pixel height of textures: each clock image could be no more than 10 pixels high. This would have been more of a wristwatch than a clock tower...

So, I decided to implement a digital clock instead, since that could be made as large as needed. (Not to mention the laugh value of a digital clock tower. It would have been even funnier if an idea of mine had proved practical: have the clock initially be flashing 12:00, like a VCR whose owner doesn't know how to set its clock.) The mechanism driving the clock is still a pair of Enforcer/Tick shooting galleries, basically the same as the combination lock digits. There are a few changes: • There are no indicators, the control and target platforms are directly connected. • The target platforms have 12 stops in an 11 WU height, rather than 8 stops in 7 WU. • There is a switch in front of EACH of the target platform stops, which light up the appropriate segments of the digital display (actually, one switch is missing in each gallery: this will be explained later).

The clock display itself contains no moving parts: it's all done with lights. I used a custom texture (actually, parts of the same texture containing the combination lock digits) for a very realistic-looking digital display. It would also be possible to build digits out of existing textures: Mike Trinder's Gemini Station map for Marathon 2 has a good example of this, using the lava texture. However: • Digits built this way require more polygons, since you have to blank out the spaces between segments rather than simply having blank space in the texture. My clock tower wouldn't work with any more polygons, it's on the border of exceeding the transparent side limit as it is (in fact it exceeds the limit if you look out from the inside of the tower). This problem is due to the fact that my clock overhangs a door: a display set into a solid wall would have no transparent side problems since each digit would be separated by negative space. • There is no really suitable texture in the Water texture set, which was the only practical choice I had for Missed Island. 
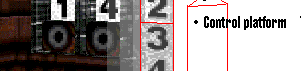
There is a sample clock digit for you to examine, just prior to this terminal. It is in a slightly incomplete state, so that you can see it better: the polygon floors and ceilings have not been blanked out, and the digit still has a lot of depth to it (the polygons are easier to select in this state, but should be "flattened" before release).

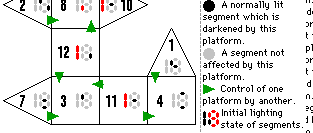
Some thought is needed in assigning lights to the digit segments, to avoid wasting any lights. The diagram shows the assignments I used on Missed Island. It's obvious that the two segments composing the tens-of-hours digit can use the same light. But would you have guessed that the top and bottom segments of the tens-of-minutes digit can also be wired together (light 31)? That digit only displays numbers from 0 to 5, which coincidentally all have the top and bottom segments in the same state: only the number 7 has them different. The ones-of-minutes digit is the simplest of all, since it never displays anything other than 0 or 5.

Now we consider the task of lighting the proper digit segments corresponding to the currently enabled switches in the hours and minutes shooting galleries. Tag switches won't work: there aren't nearly enough tags, and there's no way to have a light that is enabled by more than one tag. There are basically two ways in which lights can be controlled other than by some direct action of the player: 1. Locating a light switch so that a creature's shots hit it. This is fine for limited use, but if we tried to create a separate shooting gallery for each of the digit segment lights, we'd quickly exceed the limit of 32 active creatures (we'd also run out of platforms or liquids to control the creatures' firing). 2. Using the Activate and Deactivate Polygon Lights flags on a platform. This allows a platform (controlled by whatever method) to activate and/or deactivate up to two lights (its floor and ceiling lights) in sync with its own activation and deactivation. (Polygons also specify a liquid light, but it is not affected by these flags.) This idea has great promise, but as you'll see, it will require a lot of work to turn it into a practical implementation.

The basic idea is to have each shooting gallery switch activate a platform, which in turn activates lights. Platform settings include Deactivates At Each Level, Can't Deactivate Externally, Activates Polygon Lights, and Deactivates Polygon Lights. Note that the controlled lights are periodically deactivated: in the duration between the platform's self-deactivation and the next activation from the shooting gallery. To avoid flicker, the digit segment lights all have a Becoming Inactive phase of constant 100% for 2 seconds: therefore the segments don't immediately appear to turn off when deactivated. Obviously, most of the individual hour and minute numbers require more lights to be turned on than the two that can be controlled by a single platform. This is not a problem...

...since the platform can control another platform (via the Activate Adjacent On Activating flag), which can control two more lights. Either platform can control yet another platform, so an arbitrary number of lights can be activated by a single platform activation. The ideas developed so far would be sufficient to make a working clock, but it would be horribly inefficient. Consider the implementation of hour 8: the digit 8 has seven lit segments, so four platforms would be needed to activate all the necessary lights (one platform would have the same light for both floor and ceiling, to avoid affecting an unrelated light). It would take about 32 platforms (half the number available!) just to implement all twelve hours, never mind the minutes. So back to the drawing board...

The design can be simplified by a process best described as "factoring out common terms". It is possible to identify individual lights, or pairs of lights, that are activated by many different hour/minute settings. Instead of independently activating these lights for each setting, have a single platform that activates each common light or pair of lights. Each setting that uses common lights would have its own platform adjacent to the appropriate common platforms. Note that the common platforms cannot control any further platforms, since they would also activate ALL of the platforms adjacent to them. This scheme requires extensive (possibly illegal) use of 5D space in order to have everything adjacent to the proper platforms. Not a problem, since the player has no access to the area. Using the factoring technique, I was able to implement the first working version of the clock tower with about 40 platforms. Along with the 13 platforms of the combination lock puzzle, and a few doors, that pretty much used up all of Marathon's platform limit, long before the level was complete. So back to the drawing board again... The final optimization of the clock was based on the following observation: most of the digit segments are lit most of the time (in fact, only the digits 1 and 7 have less than half of their segments lit). Therefore, it is better to have those lights ON by default, and only turn them OFF in the few situations that need to. Since platforms don't have a Deactivate Polygon Lights On Activating flag, this requires lights wired backwards (0% intensity when active, 100% when inactive).

After months of research and extensive simulation done on a Cray XMP supercomputer (well, I might be exaggerating just a bit), I came up with the following set of segments that should be lit by default: 9:30. This is what you'd see on the tower in Forge, where the shooting galleries are inoperative: in the actual game, the Enforcers in the galleries will be triggered well before your first sight of the clock tower. (The Visible Trigger polygon that starts the clock is between the library and fountain: the trigger message travels down to the clock tower, through a 5D space polygon behind the tower, to the galleries north of the island. There are a LOT of Zone Border polygons used to define this path. You can't see the connecting 5D polygon on your automap because the entrance to it is sealed off by a solid, nontransparent line.) The default value of 9 for the hours has the following consequences: • No hour needs more than one platform directly associated with it. Four of the hours change no more than two lights from the default state, and therefore can be implemented by a single platform. The rest can be factored into 1-2 lights specific to that hour, plus triggering one or two of those four simple hours. • The 9 o'clock setting doesn't have to do anything: no platforms, not even a switch in the hours shooting gallery. • There is at least one hour that isn't triggered by anything else, and only controls one light (actually, both 5 and 6 o'clock have this property). The additional light control can be used to trigger the puzzle's solution, without requiring an additional platform. (On the minutes side, 00 and 05 had this property. 6:05 was an arbitrary 1-out-of-4 choice.)

A total of 11 platforms were required to implement the hours portion of the clock, which I believe is the theoretical smallest number that could do the job. Here's the final version. Gaze in stunned disbelief at the implementation of the most complicated Marathon mechanism ever built... The minutes portion is similar in design, although it didn't work out quite as efficiently (it required 12 platforms, one more than the theoretical minimum). The final piece of the puzzle is a 3-input AND gate, using the liquid-controlled version, that triggers the bridge and clock tower door. The 3 inputs are the proper hours setting, the proper minutes setting, and the rightmost switch on the clock setting panel.

CLOCK TOWER PUZZLE - SUMMARY Resources used: • 4 platforms + 2 Enforcers + 2 Ticks in the shooting galleries • 11 platforms in the hours mechanism • 12 platforms in the minutes mechanism • 16 lights in the display • Half of a texture, for the digit segments • 3 lights + 3 liquids + 1 Enforcer + 1 Tick in the AND gate • 2 purely decorative lights (the slow and fast flashing lights that distinguish the hour and minute setting switches) • 1 tag + 2 platforms as the final action Totals: • 29 platforms (45% of the per-level limit) • 21 lights (33%) • 3 liquids (19%) • 1 tag (7%) • 6 active creatures (19%)

terminal 5

terminal 6

terminal 7

terminal 8

terminal 9

terminal 10

terminal 11

unfinished

Well, what did you expect to see when you accessed the terminal from this direction? This is the obligatory SECRET TERMINAL, the only one in this scenario. Make sure you've also visited this terminal from the other direction. The trick to creating horizontal terminals like this one: you can't. A terminal (or switch or recharger) texture placed on a floor or ceiling is merely decorative. The actual terminals are on very short walls, on either side of the polygon with the visible terminal: the polygon is raised 0.01 WU above the surrounding floor to create these walls. This trick was used to implement the binoculars in the lookout tower on Missed Island. What you actually see when using them are terminals on a very short rise in the floor, halfway into the alcoves where the binoculars are located. Another trick for hiding terminals, switches, or rechargers is to put a non-transparent texture on a line just in front of them: that's how the switch that opens the library bookcase was implemented.